Saturday, May 16, 2015

Turn images into 1-bit dithered black and white

Dithering occurs when you have a limited number of colors, say 256 for GIF's or 2 for black and white, and want to represent subtle gradations between colors without creating bands of color. The resulting images take up far less space than those with colorspaces of thousands or millions of colors. GIMP can handle dithering, although it's not obvious how to do so.

Goal:

Although dithering is a sign of low quality, I personally like its effects. And the continued popularity of 256-color GIFs supports me. I wanted to turn a full-color image into a black-and-white image, and also see how many kilobytes smaller it became.

Walkthrough

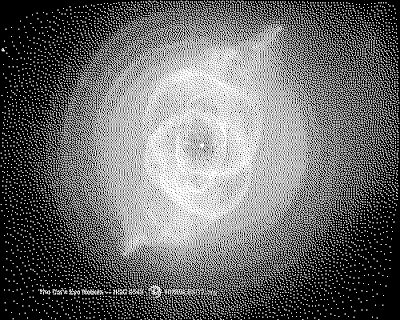
  1. I chose this photo of the Cat Eye Nebula, from NASA's Hubble site. I shrank it down to 500 by 400 pixels, to more clearly see the effects of dithering, and exported it as a PNG, default settings. It weighs in at 292 kB.
  2. To start dithering, go to Image > Mode > Indexed... in the menubar. It'll pop up a window like the one below, where you can choose the colormap. You have the option to map it to several palettes, or a web-optimized palette, but why use any colors at all? Choose "Use black and white (1-bit) palette" to get the lowest quality possible. Then next to "Color dithering", choose any of the options.


  3. Save and export, if you choose. The PNG format may yield better results than JPEG because it's a lossless compression algorithm.

Result

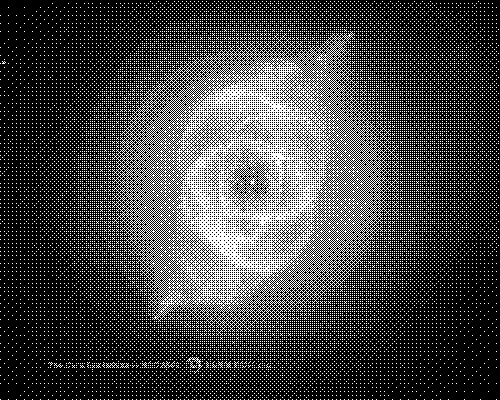
These are the results of the 4 choices of dithering mode: "None" gives you featureless blotches, while the other choices of dithering cleverly intersperse white and black pixels to give the appearance of different gray tones.

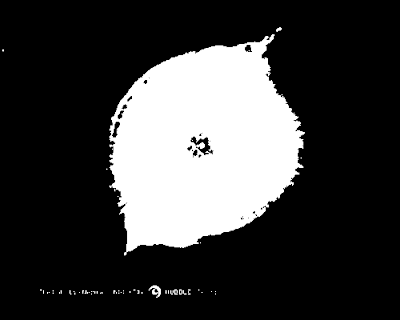
None (no dithering): 4 kB

Floyd-Steinberg (normal) (my preference): 19 kB

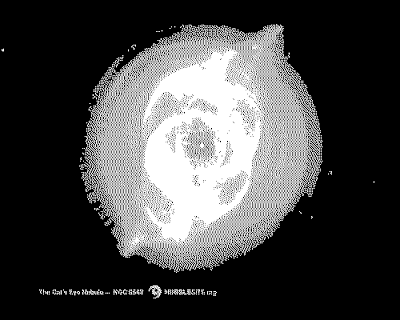
Floyd-Steinberg (reduced color bleeding): 9 kB
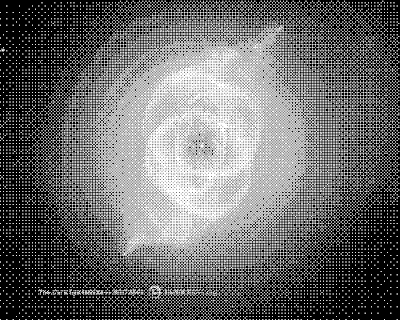
Positioned: 7 kB

Learn More

Here is the GIMP documentation for this feature.

Monday, February 23, 2015

Use Resynthesizer to quickly remove something

The Resynthesizer plugin for GIMP has been in development since 2000, according to the documentation, though it closely resembles a feature Photoshop introduced back in 2011. Both tools can remove an object from an image by covering it with nearby textures. Resynthesizer can also take one sample of a texture and seamlessly fill a whole image with it.

Goal

Remove the two hiking boots from this image:

Walkthrough


  1. Select one of the boots somehow. I used the Scissors Select tool, which automatically aligns your selection to the edge of an object. You start by clicking anywhere on the boot's outline, and then continue to click around its outline. The line of your selection will fit itself to the best path between every two points, but if it missed, click the middle of the misplaced line and drag it to where it should be. Go in a circle and close the loop by clicking the first point you placed. Then hit Return to make it into a selection.
  2. Optional, helpful with shadows: Go to Select > Grow... in the menubar, and in the resulting window, type in a number over 50, click OK, and see how much bigger the selection gets. I wanted to get the selection boundary outside the shadow of the boot, so the next step wouldn't fill it with a dark texture. If 50 is too far or too short, go to Edit > Undo or hit the shortcut Command-Z, and try step 2 again. I grew the selection by 100 pixels.
  3. When you have the selection you want, go to Filters > Enhance > Heal selection... and in the window that pops up, type in a generous radius to take texture from. 100 was ideal for this image. This is the number of pixels outside your selection the program will go to search for textures. In the picture below, I didn't grow the selection or choose a large enough radius, and it filled the boot with a conspicuous dirt-like texture. Click OK and let it do its thing.
  4. Resynthesizer is a CPU-hungry process, GIMP is a slow program, and both these factors will make this process take a long time. 1 or 2 mysterious icons should pop up in your Dock, with names like "script-fu." These are processes GIMP is calling on to get the job done. If you force quit one of them, and I have done so before, options will disappear from your Filters menu, and you'll have to restart GIMP to get them back.
  5. When the loading screen disappears, GIMP may still take several seconds to draw your updated image. Be patient. If it doesn't look how you wanted, hit Undo and play around with the size of the selection or the radius to take the texture from.

Result

After applying the tool to both boots, they are effectively removed from the picture.

Learn More

A DuckDuckGo search turned up this lengthy post by Pat David, which gives a much longer explanation of what the plugin will do. I didn't base my walkthrough on his post, but I'll probably refer back to it in the future.